top of page
.png)
Call 07866 426 948 | Free quotation, no obligation
Professional Decorating Services
Landlords - Home Owners - Commercial Units
Fixing Cracks in Plaster?
What causes cracks in plastered walls and ceilings and what is the best way to fix it?
Cracks in plastered walls and ceilings can be caused by a variety of factors, including:
Age: Over time, plaster can dry out and become brittle, leading to cracks.
Settlement: Similar to elsewhere, when a building settles over time, it can cause plaster to crack.
Vibration: Properties located near railways, busy roads or under the flight path of planes can experience cracks due to the constant vibration from these activities.
Weather: The damp and humid UK weather can also cause plaster to expand and contract, leading to cracks.
Poor installation: If the plaster wasn't applied correctly, it can crack as it dries. Also, if the surface that has been plastered is not stable then this will cause cracks.
Gypsum plaster: Gypsum plaster, commonly used in the UK, is more prone to cracking than other types of plaster.
So how should you repair cracks in plaster?
There a couple of ways to approach repairs depending on how large they are. For fine cracks I would make the crack larger prior to filling with a sharp decorators knife as this will provide a larger space for the filler to sit in and hold more securely.
Apply filler with a sharp filling knife, allow to dry and then apply a second coat of filler as the first coat will usually be drawn into the crack and will dry with a dip in the filler.
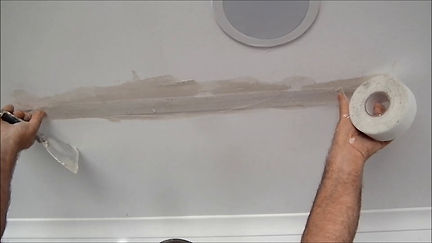
Using scrim for larger cracks
I also use scrim or a fine mesh with filler to help bind a crack, this can be a good approach in some cases, particularly for larger cracks or cracks that are likely to reappear. Scrim is a type of mesh tape that is embedded in plaster or joint compound to provide additional support and reinforcement. By using scrim or mesh with filler, the strength of the repair is increased, and the risk of the crack reappearing is reduced.
Here are the general steps to follow when using scrim or mesh with filler to fix cracks in plastered walls and ceilings:
Clean the area: Use a stiff-bristled brush to remove any loose debris or plaster around the crack.
Apply a base coat: Use a filling knife to apply a base coat of plaster or joint compound over the crack, making sure to extend the coat a few inches beyond the crack on either side.
Embed the mesh: While the base coat is still wet, lay the scrim or mesh tape over the crack, pressing it firmly into the base coat with a putty knife or trowel. Make sure to smooth out any air bubbles or wrinkles.
Apply additional coats: Apply additional coats of plaster or joint compound over the mesh, building up the repair until it is flush with the surrounding surface. Allow each coat to dry completely before applying the next.
Sand and paint: Once the final coat has dried, sand the surface smooth clean away dust, apply a suitable primer and paint to match the surrounding wall or ceiling. If you wrap the sand paper around a sanding block or square piece of wood then this will help you get a flatter finish.
Overall, using scrim or mesh with filler can be an effective way to fix cracks in plastered walls and ceilings, especially for larger or recurring cracks. However, it is important to ensure that the underlying cause of the crack has been addressed before making any repairs to prevent the issue from reoccurring.


bottom of page